Posterior Cruciate-Retaining Total Knee Arthroplasty
- Abstract
- Case Overview
- Surgical Technique
- Anesthesia and Patient Positioning
- Positioning of the Patient
- Sterile Preparation of the Leg
- Medial Parapatellar Arthrotomy
- Completing the Exposure
- Preparation of the Femur
- The Valgus Angle
- Placement of the AP Cutting Jig
- Completing the Femoral Cuts
- Assessing the Potential for Cementless Femoral Fixation
- Preparation of the Patella
- Preparation of the Tibia
- Assessment of Patellar Tracking
- Final Preparation Prior to Cementing of Components
- Cementing Components
- Draining and Closing the Wound
- Peri-Operative Management
- Equipment
- Disclosures
- Statement of Consent
- Citations
Abstract
Total knee arthroplasty has evolved into a very successful procedure to relieve pain and restore function in the arthritic knee with advanced structural damage. Optimal results are dependent on the restoration of alignment and ligament stability. Operative techniques involve either preservation of the posterior cruciate ligament or substitution of its function through increased prosthetic constraint. The vast majority of knees do not require cruciate substitution to establish appropriate stability and function. This video outlines the operative technique used by the author for posterior cruciate-retaining total knee arthroplasty in a patient with a preoperative varus deformity.
Case Overview
Clinical Presentation
The patient is a 74-year-old female who is status post successful right knee replacement performed elsewhere. She now presents with weight-bearing pain in her left knee and loss of ability to walk distances without the use of a cane. She ascends stairs one step at a time using a handrail. She needs arm assist to arise from a chair. She takes over-the-counter anti-inflammatory medicine daily for the pain and has not received any sustained relief from intra-articular steroid injections and a supervised physical therapy program.
Physical Exam
Physical exam reveals a healthy appearing elderly female who ambulates with an antalgic gait on the left side. Her left knee is in approximately 5° of anatomic varus. She lacks 5° of extension with further passive flexion to 105°. There is bony crepitus medially with varus stress. There is a small effusion and no popliteal cyst. Her pedal pulses are palpable. Her ipsilateral hip has full range of motion without pain or spasm.
Imaging Studies
Radiographs including a standing AP, lateral, and skyline view show complete loss of medial joint space, subchondral sclerosis, and peripheral osteophyte formation. There are secondary arthritic changes in the lateral compartment (Fig.1).
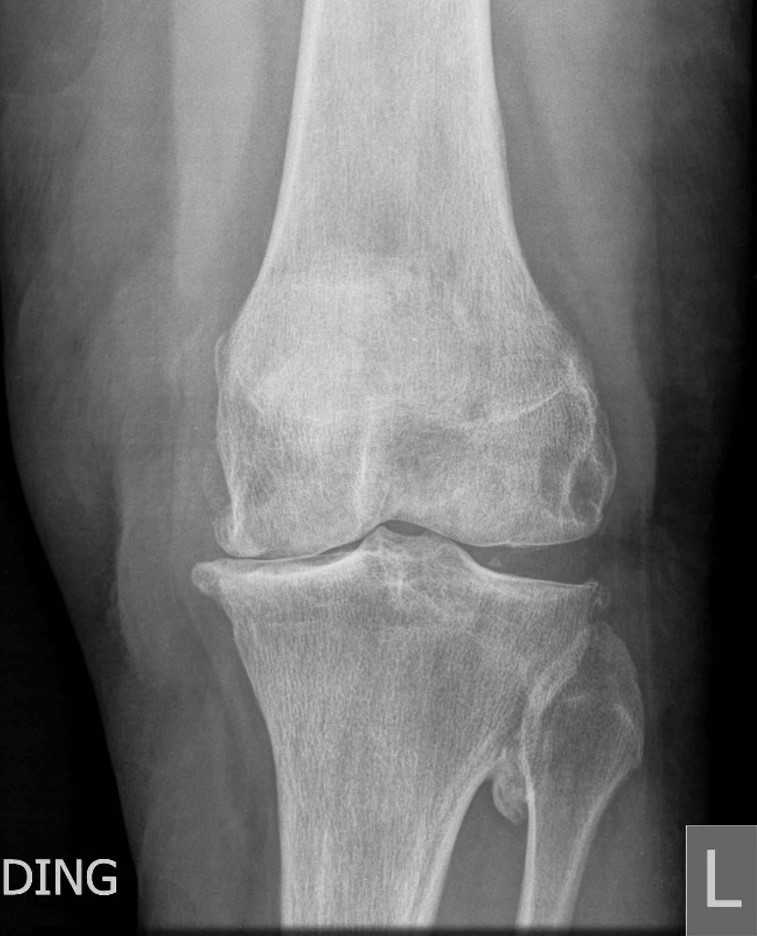 Fig.1 Pre-operative AP radiograph showing the patient’s varus deformity with complete loss of medial joint space, subchondral sclerosis, peripheral medial osteophytes and secondary lateral compartment changes.
 Fig.2a Post-operative AP radiograph showing restoration of proper anatomic axis.
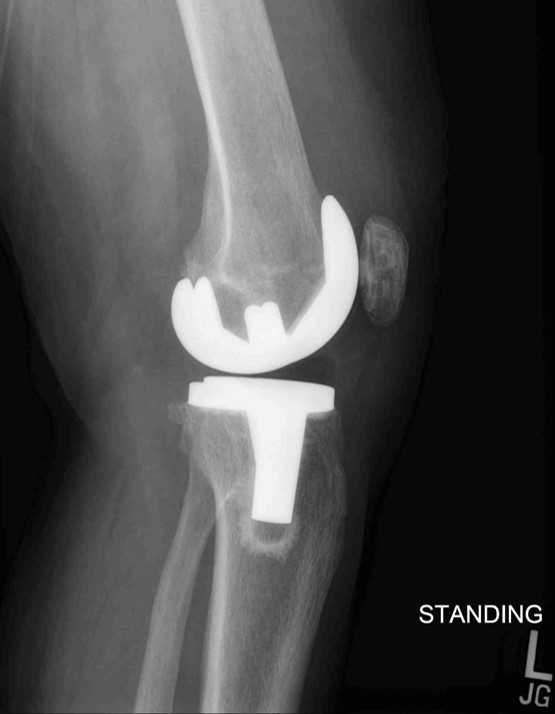 Fig.2b Post-operative lateral radiograph showing appropriate alignment and sizing of the femoral and tibial components.
Natural History
If left untreated, the natural history of this patient’s condition is one of increasing pain and disability with increased need for ambulatory support and possible need for the chronic use of narcotics for pain relief. In addition, there is the probable need for modification of her home environment to accommodate her deteriorating condition.
Rationale for Treatment
The rationale for proceeding with total knee replacement in this case is to alleviate the patient’s pain, restore function, and improve her quality of life.1 Surgery is contraindicated in the presence of infection or medical conditions such as significant cardiopulmonary, peripheral vascular, or neurologic disease that make the surgery a prohibitive risk.
Surgical Technique
Anesthesia and Patient Positioning
The surgery can be performed under general or regional anesthesia or a combination of both. Femoral or adductor nerve blocks are often administered before or immediately after surgery to help relieve post-operative pain. Many surgeons also employ the use of intra-operative infiltration of the peri-capsular tissues with analgesic or anti-inflammatory medication to diminish post-operative discomfort.
Positioning of the Patient
Total knee arthroplasty is always performed with the patient in the supine position. The operating table should be level. The rare exception occurs when TKA is being performed below a fused or ankylosed hip.2 In this case, the table is in the level position for the exposure and closure. During the arthroplasty, the patient is placed in the Trendelenburg position and the foot of the table is dropped; the uninvolved leg is supported on a separate stool or table.
I usually expose the knee in flexion, especially in obese patients or if a tourniquet is not utilized. An exception might be the knee with a prior incision, especially a curvilinear one, where skin flaps need to be elevated. I close the knee in extension except for placement of the most proximal sutures in the quadriceps mechanism, which is facilitated by a flexed knee and a proximal self-retaining retractor.
Placement of the Footrest
I prefer a commercially available cylindrical footrest that supports the knee in flexion during the arthroplasty. If this is not available, a satisfactory substitute is a towel or blanket rolled into a cylinder and taped into position. The optimal level for placement of this support is at the fattest part of the patient’s calf. This supports the knee in maximal flexion after satisfactory exposure has been achieved. The level for this support, therefore, is independent of the preoperative range of motion but reflects the flexion that will be achieved once the quadriceps mechanism is everted and the knee is mobilized.
Sterile Preparation of the Leg
Any shaving of hair around the area of the planned incision is done just prior to sterile preparation of the leg. I draw the knee incision with an indelible marking pen prior to the skin prep. Any prior incisions are outlined and incorporated, if appropriate. The incision is drawn with the knee flexed 90° to account for the fact that the skin is translated laterally about 1 cm from extension to flexion because the tibia internally rotates.3 If the patient desires to kneel after surgery and the incision is drawn in extension, they will most likely kneel on their incision atop the tibial tubercle, causing discomfort. I include the foot in the prep and then hold the foot with a sterile towel as the remainder of the leg is prepped. An impervious stockinette is then rolled from the foot to the level of the thigh tourniquet. A so-called “extremity sheet” completes the draping. The stockinette is incised vertically to expose the drawn skin incision, and the operating surgeon’s initials to positively identify the patient and complete the mandated “Time Out.” Finally, a betadine impregnated plastic drape is used to seal off the surgical site.
The Tourniquet
I utilize a tourniquet for all total knee arthroplasties with essentially two exceptions. The first is in the obese patient, especially one with a short thigh. A tourniquet is often ineffective in these patients and compromises the proximal extent of the surgical field.
The second exception is a patient with known peripheral vascular disease and absent pulses confirmed by Doppler examination. These patients always have a consultation with a vascular surgeon preoperatively. Even if there has been successful bypass surgery, I do not use a tourniquet. The incision and initial exposure are made with the knee in flexion, which minimizes bleeding and allows the vessels to be coagulated as they are encountered.
The tourniquet pressure utilized is 250 mmHg in most cases. Occasionally, pressure as high as 325 mmHg is necessary to avoid a venous tourniquet effect. Maximum tourniquet time is 90 minutes with a 10-minute interval before re-inflation is considered. I elevate the limb for 30 seconds prior to inflation of the tourniquet. I prefer not to exsanguinate the limb with an elastic bandage (Esmarch’s bandage) so that some blood remains in the superficial veins and they are easier to identify. The first dose of prophylactic antibiotics is given at least 10 minutes before tourniquet inflation. Recently, many surgeons (including myself) are using the tourniquet for only a few minutes during initial exposure and re-inflate it for approximately 10 minutes for cementing.
The Incision
As mentioned above, the incision is drawn with the knee flexed prior to the surgical prep. A standard incision is straight, vertical, and approximately 15 cm long. It is centered proximally over the shaft of the femur, in its mid portion over the mid third of the patella and distally just medial to the tibial tubercle. There is a trend toward making shorter incisions, and this can be done by lessening the proximal half of the skin incision. If the initial exposure and closure are done with the knee in flexion, the proximal quadriceps can be accessed through a shorter skin incision.
Skin incisions must be modified in the presence of prior incisions about the knee. I prefer to avoid elevating large skin flaps and creating dead space. The subcutaneous dissection heads directly toward the landmarks for a medial parapatellar arthrotomy. Elevation of skin over the dorsal surface of the patella is only the amount that is sufficient to safely apply a holding clamp for cementing the patellar component.
Medial Parapatellar Arthrotomy
I prefer a medial parapatellar arthrotomy for all primary knees. In the past 40 years, I have had experience with three alternative approaches to the knee: subvastus, mid-vastus, and lateral parapatellar. I certainly do not object to their use in selected patients. Each, however, has potential disadvantages. For example, the subvastus and mid-vastus approaches can be difficult in short, obese, and muscular individuals. If a medial advancement is necessary at the time of closure, it may be difficult to achieve with these approaches. The lateral approach for valgus knees may prevent the surgeon from safely everting the patella medially. It may also be difficult to seal the arthrotomy from the subcutaneous space just beneath the skin incision with this approach.
The medial parapatellar approach can be used in virtually every case regardless of the preoperative deformity and range of motion. The three essential landmarks are the proximal medial border of the quadriceps tendon, a point halfway between the medialis insertion and the superior medial pole of the patella, and the medial border of the tubercle.
2 or 3 mm of the medial border of the quadriceps tendon are preserved proximally. At the superior pole of the patella, a soft tissue cuff is preserved to facilitate closure. At the tibial tubercle, a medial soft tissue cuff is carefully preserved for closure to the medial border of the patellar tendon. I mark the medial and lateral edges of the arthrotomy at the level of the superior pole of the patella to facilitate an anatomic closure at the end of the procedure.
At the joint line, the arthrotomy severs the anterior horn of the medial meniscus. This facilitates eversion of the medial capsular tissue with the remaining meniscus attached for safe dissection of a subperiosteal anteromedial flap. Careful preservation of this flap permits a secure distal closure at the end of the procedure. It also allows for the possibility of a side-to-side repair to the patellar tendon should the tendon’s insertion be compromised.
The initial lateral dissection involves defining the infrapatellar bursa to the level of the patellar tendon insertion. A No. 10 blade is slid upside down into the bursa and tangential to the anterolateral tibial cortex. The scalpel is then passed coronally in this plane severing the coronary ligament and anterior horn of the lateral meniscus. In almost every case, the patella is then easily and safely everted. If eversion is difficult, I do not hesitate to perform a proximal release via a short inverted “V” incision in the proximal quadriceps tendon. In morbidly obese patients or ankylosed knees, the clamp used to cement the patellar component can be used to grip the patella securely and facilitate eversion.4
Completing the Exposure
Before preparation of the bones is initiated, certain measures are taken to maximize exposure and mobilize the knee.
First, the patellofemoral ligament is released. This is accomplished by putting a Z-retractor into the lateral compartment to tension this ligament. A curved hemostat is passed beneath its leading anterior edge, and a cutting cautery severs its fibers. This further mobilizes the patella and improves the exposure to the lateral compartment. Care must be taken to avoid inadvertently injuring the quadriceps tendon or placing the clamp so deeply as to involve the popliteus tendon or lateral collateral ligament.
Next, the Z-retractor is placed medially, and the anterior horn of the medial meniscus is excised. This gains access to the plane between the deep medial collateral ligament and the superior border of the medial tibial plateau. A curved, 1-cm osteotome is inserted into this plane and tapped posteriorly until it dissects its way into the semimembranous bursa. The anterior cruciate ligament, if intact, is completely sacrificed. The tibia can then be delivered in front of the femur by hyperflexing the knee, pulling the tibia forward, and externally rotating it.
Prior to removing the lateral meniscus, a scalpel is used to create a 1- to 2-cm slit just peripheral to the lateral meniscus at the junction between its anterior and middle thirds. Through this slit is placed a bent Hohmann retractor, which will be used throughout the operation for lateral exposure.
The lateral compartment is now well exposed. The entire lateral meniscus is removed with sharp dissection; I find it is easiest to start at the posterior horn and then return to the anterior horn and midsubstance until the resection is complete. The lateral inferior genicular artery will be encountered just peripheral to the meniscus during this dissection. The open lumen of both artery and vein are usually easily visualized in the posterior lateral corner of the knee and are coagulated to minimize postoperative bleeding. Finally, the fat pad is dissected off the anterior proximal portion of the lateral tibial plateau to allow eventual placement of the tibial cutting jig. A small amount of the fat pad can be removed, if necessary, for better exposure.
Preparation of the Femur
Either the femur or the tibia can be prepared first for TKA. I prefer femur first in primary surgeries because after femoral resection has been completed, the tibial exposure is facilitated. In revision surgery, however, I always prepare the tibia first. In a primary procedure, the amount of femoral and tibial bone resection and the alignment angles are independent of each other if the surgeon’s goal is to perform measured resections based on thickness of components and maintenance of the joint line. The only bone cuts that are dependent on one another are those that determine the rotational alignment of the femoral component. Tibia-first surgeons create flexion gap symmetry by using spacer blocks. Femur-first surgeons can establish flexion gap symmetry by relating the femoral component rotation to an external tibial alignment device.
To prepare the femur, it is important to first define the anatomy of the intercondylar notch and expose and define the PCL origin. Intercondylar osteophytes are removed with a 1-cm-wide osteotome and dissected free of the PCL. The medullary canal of the femur is entered approximately 1 cm above the origin of the PCL and a few millimeters medial to the true center of the intercondylar notch. One way to define this is to draw the Whiteside line down the deepest part of the trochlear sulcus and mark the entry point 1 cm above the top of the intercondylar notch and several mm medial to the Whiteside line. The preoperative anteroposterior (AP) radiograph of the femur will also help locate the entry point for the intramedullary alignment rod. This can be done by passing a line down the center of the shaft of the femur and seeing where it exits in the intercondylar notch. As noted, it is usually several millimeters medial to the true center. If the canal were to be entered in the true center of the notch, the valgus angle chosen would be effectively increased by several degrees. I think this is the most common reason why surgeons inadvertently place the femoral component in too much valgus. They enter the canal in the true center of the notch and utilize a 7° valgus bushing. The actual angle of the distal femoral resection becomes 9° or 10° of valgus.
Once the entry point is chosen, I prefer to use a small gouge to initiate the hole and allow the drill to subsequently precisely enter into the chosen spot. The drill hole should be larger than the diameter of the intramedullary alignment rod. I use a 3/8-inch drill and a 1/4-inch-diameter alignment rod. Some surgeons aspirate the fatty marrow from the distal femur and irrigate the canal. I have not found this to be necessary so long as the intramedullary alignment rod is smaller than the entry hole, fluted, and introduced slowly and gently. If there is any difficulty introducing the rod, the entry hole should be enlarged. On rare occasions when the rod fails to pass easily, I have found it helpful to first introduce an undersized rod to define the orientation of the canal. This method may reveal that the entry hole must be enlarged into one of four quadrants to allow easy passage.
Distal Femoral Resection
The decision now has to be made about the amount of distal resection and the desired valgus angle. I think that many technique brochures are misleading concerning the amount of distal resection. They often recommend removing an amount of bone that is equivalent to the thickness of the metallic distal femoral condyle of the prosthesis. They should clarify that the amount of resection should also include the thickness of cartilage that was once present. Otherwise, the distal femoral resection will be approximately 2 mm more than a true “anatomic” amount. This would slightly elevate the joint line and possibly set up a knee that is looser in extension than in flexion.
In a PCL-preserving technique, the goal should be to restore the femoral joint line as precisely as possible and avoid a knee that is tighter in flexion than in extension. Erring toward under-resecting the distal femoral condyle will achieve this goal. If, after initial preparation of both the femur and tibia, the knee is tighter in extension than in flexion, the distal femur can be revisited for 2 more millimeters of resection. This is quick and simple to accomplish. Excessive distal femoral resection is better tolerated in a PCL-substituting technique. Removing the PCL enlarges the flexion gap and allows the thicker polyethylene required to stabilize the knee in flexion also to be tolerated in extension.
In the presence of a preoperative flexion contracture, more than an anatomic amount of the distal condyle is resected to aid in correction of the contracture.
The Valgus Angle
The valgus angle chosen for the distal resection depends on preoperative templating and certain clinical factors. The goal in the majority of knee arthroplasties is to restore the mechanical axis to neutral. This is most efficiently achieved by creating a neutral mechanical axis at the distal femur and a neutral mechanical axis at the proximal tibia. To determine this angle, a long AP radiograph from the hip to the knee is taken in neutral rotation. A line is drawn from the center of the hip to the center of the knee. A perpendicular is then made at the knee to this line. Finally, the angle formed by this line and a line of the center of the shaft of the femur can be measured. Usually the angle is between 5° and 7°.
Another advantage of this preoperative templating is to show the relative amounts of resection of the medial and lateral distal femoral condyles. Unless there is some sort of osteotomy, fracture, or dysplastic deformity, the amount of resection usually is slightly more medial than lateral. The line formed at the joint for a neutral mechanical axis will often be at the level of eburnated bone medially and intact cartilage laterally, or roughly 2 mm away from of the actual bone of the distal lateral condyle. This information is useful when the distal cutting guide is applied and confirms what is shown on the preoperative templated radiograph. In severe valgus knees, this discrepancy can be quite considerable.
There are a few exceptions to attempting to accurately restore a neutral femoral mechanical axis. They all involve leaving the knee in slight (1° or 2°) mechanical varus alignment. The reason would be to decrease stress on the medial collateral ligament. The most common situation involves correction of a severe valgus deformity with an attenuated medial collateral ligament. By overcorrecting the alignment into a degree or two of mechanical varus, stress is taken off the medial side of the knee. Similarly, if there is inadvertent injury to the medial collateral ligament, some residual varus mechanical alignment will protect any surgical repair of the ligament.
Residual varus mechanical alignment used to be discouraged in the routine primary knee, but is preferred for cosmetic purposes over residual mechanical valgus alignment in the obese patient with excessive medial soft tissues. Clinically, these patients appear to be in much more anatomic valgus than that represented by their radiographic alignment. If a neutral mechanical axis is chosen for these patients, they should be forewarned of the apparent valgus appearance of the limb. In addition, it is also easier to achieve symmetric extension balancing if the surgeon accepts slight mechanical varus. I now cut most varus knees in four degrees of valgus to facilitate ligament balance.
Sizing the Femur
I prefer to size the femur from posterior upward. This method is the most reliable to restore the joint line in flexion, balance the PCL, and minimize the chance for mid-flexion laxity. Two skids slide under the posterior condyles and a movable stylus measures the AP dimension of the femur based on the anterior cortex just superior to the trochlea. The anterior femoral cortex can sometimes be difficult to define. To facilitate this, I now make a preliminary conservative trochlear resection perpendicular to the Whiteside line.
If the sizing measurement shows a dimension at a half size or larger, I will use the larger size. An exception to this rule would be a patient with poor preoperative flexion where an attempt is made to make the prosthetic trochlea as flush with the anterior cortex as possible to increase quadriceps excursion. Another exception would be the patient (usually female) whose medial lateral dimension is proportionally smaller than their AP dimension. Using the larger size would cause too much mediolateral overhang. Thus, the smaller size is chosen.
For half sizes and smaller, I choose the smaller size. The two options that allow downsizing without notching the anterior cortex are to make the distal femoral resection in a few degrees of flexion or to size the femur from anterior downward. Many of the newer prosthetic systems offer a large inventory of AP and ML dimensions that allow more precise sizing but at the cost of a very large cumbersome inventory.
Determining the Rotational Alignment of the Femoral Component
After the femoral component has been sized, its proper rotational alignment must be determined. At least four methods are popularly used to determine femoral component rotation.5 These include perpendicular to the Whiteside line (the trans-sulcus axis), the trans-epicondylar axis, 3° of external rotation off the posterior condyles and rotational alignment that yields flexion gap symmetry. During surgery, I assess all four methods, but my primary consideration is flexion gap symmetry.6 The sizing guide I use provides for the placement of pinholes for the subsequent cutting guides that can automatically build in 3° of external rotation. I use these to set my preliminary rotation and then add more external rotation as needed to achieve a rectangular flexion gap, the technique known as “gap balancing.” This method is used by surgeons who want to establish a balanced rectangular flexion gap for optimal knee stability and kinematic function. In varus knees, the extension gap is balanced first by the appropriate medial release. In most valgus knees (that can be balanced without lateral collateral ligament release) prior extension balancing is not required. After extension balancing, the knee is placed in 90° of flexion and some form of tensiometer is applied to the medial and lateral compartments. The femoral component is then rotated into flexion gap symmetry. Laminar spreaders can be used for this purpose. A laminar spreader will open up the medial gap a finite amount regardless of the tension applied unless the anterior aspect of this ligament is abnormal or injured. It must be remembered, however, that that lateral compartment is more pliable in flexion than the medial compartment. For this reason, it is probably helpful to use a calibrated spreader on the lateral side even though the exact amount of tension to apply has not been established. I have used 20 lb of tension over the past 10 years with good results. When using this method, well over 90% of knees end up in 5° of external rotation relative to the posterior femoral condylar line. There are two exceptions to this. One occurs in the severe valgus knee with a hypoplastic posterior lateral femoral condyle where 7° or 8° may be indicated. The second is seen in the severe varus knee where the medial posterior femoral condyle is “hyperplastic,” and as much as 7° may also be required to restore a rectangular gap.
In rare cases, the knee may require no external rotation off the posterior femoral condyles or actually require intentional internal rotation. One instance occurs in a knee with laxity of the anterior aspect of the medial collateral ligament. In these cases, internally rotating the femoral component will close down the medial flexion gap and restore medial stability in flexion. The second instance can occur when converting a patient with a proximal tibial osteotomy that has healed in excessive valgus with a valgus tibial joint line. In such a case, when the knee is flexed 90°, the femoral condyles sit in marked external rotation on the valgus tibial joint line. If one uses any method other than gap balancing to determine femoral component rotation, they will create more flexion gap asymmetry and an extensive lateral collateral release will be required to balance the flexion gap. Most surgeons are concerned that purposeful femoral component internal rotation will compromise patellar tracking. It is of interest to note, however, that mathematical calculation of the actual effect of rotation on the displacement of the trochlear groove shows that for every 4° of femoral component rotation, the groove is displaced about 2mm (6). This relatively small amount can be compensated for by under-sizing the patellar component by one size and shifting it medially, beveling the un-capped patellar bone to prevent impingement.
There are also publications in the literature that suggest that femoral or tibial component mal-rotation can cause pain or stiffness and subsequent failure of the arthroplasty. This conclusion could also be the consequence of a malrotated femoral component occurring in the hands of an inexperienced surgeon who has also made a constellation of other errors in preparation of the arthroplasty.
Placement of the AP Cutting Jig
Most AP cutting jigs have spikes that will fit into the holes created through the initial sizing guide. The guide is seated flush with the distal condylar resections. The proper contact of the jig with the bone should be assessed by viewing it directly from the side. Some jigs provide ancillary pins (smooth or threaded) that will further secure the cutting jig on the end of the distal femur.
Completing the Femoral Cuts
Trochlear Resection
The anterior or trochlear cut is made first. The main concern with this cut is to be certain to avoid notching the anterior cortex. The amount of resection for each individual case can be estimated by reviewing the preoperative lateral radiograph. Occasionally, the trochlea is hypertrophic with a large amount of osteophyte formation creating the illusion that the trochlea resection will be excessive. At the opposite end of the spectrum is the “hypoplastic” trochlea seen in patients with patella alta and patellofemoral dysplasia. If there is ever concern that the trochlear resection might be excessive, the “pre-cut” of the trochlea will help determine this. This cut will expose the proximal junction between the trochlea and the anterior cortex of the femur and allow a more accurate assessment to be made concerning the potential for notching the anterior cortex. I would recommend against the practice of many surgeons who remove the fat overlying the anterior cortex and incise the periosteum. I believe that this action predisposes the knee to form heterotopic bone in this area, which could limit postoperative quadriceps excursion. If it appears that the planned trochlear resection would, in fact, notch the anterior cortex, the femur should be recut in a few degrees of flexion or the pinholes for the cutting jig should be displaced the appropriate distance anteriorly by means of the navicular gouge technique.
Posterior Condylar Resection
The posterior condylar cuts are next completed. The medial collateral ligament is in jeopardy during the medial posterior condylar resection. It is important to have a well-placed medial retractor to protect the ligament from the medial excursion of the saw blade. If a wide saw blade is initially utilized, the cuts are best completed with a narrower saw blade or an osteotome.
Chamfer Cuts
The chamfer cuts are next completed. Most systems provide an AP cutting guide with slots for the chamfer cuts. Despite this, I like to revisit the chamfer cuts with a separate chamfer guide. I do this because sometimes the AP cutting block is not fully or symmetrically seated or may lift off slightly from the end of the femur. Redoing the chamfer cuts with the isolated block ensures that they are accurate.
Final Preparation of the Femur
Final preparation of the femur is accomplished after tibial preparation when there is greater posterior exposure. The trial femoral component is applied for the first time. I use a femoral inserter that holds the component rigidly so that I can apply an extension force as the trial is seated. Femoral components tend to go into flexion when they are first applied. There are two reasons for this. The first is a trochlear cut that diverges slightly more than dictated by the anterior cutting guide. The second is due to under-resection of a posterior condyle, almost always on the medial side. The hard medial bone deflects the saw blade into a diverging pathway.
Both situations can be assessed and remedied by reapplying the AP cutting guide when the chamfer cuts have been completed. Slight divergence of the saw blade that is not apparent with the chamfer cuts intact becomes obvious when they are missing.
Once the trial femoral component is seated, it must be properly positioned in the medial-lateral dimension. Medial or lateral overhang of the prosthesis must be avoided and is most commonly seen in the female patient. The optimal mediolateral position for the component is flush with the lateral distal femoral cortex at the level of the trochlea and distal condyle. The ability to achieve this position varies with the prosthetic design. Only asymmetric femoral components can optimally cap the cut trochlear surface of the femur. Symmetric components that come flush with the medial cortex at the level of the trochlea cannot possibly fully cap the cut surface of the trochlea. Intuitively, this will compromise patellar tracking in the first 30° of flexion.
After the femoral component has been moved laterally to be flush with the lateral cortex, any remaining peripheral osteophytes are removed. It is most important to achieve this at the level of the origin of the popliteus tendon to prevent a possible popliteus impingement syndrome.7 Any overhanging medial osteophytes are also removed flush with the femoral component.
Finally, it is important to remove posterior condylar osteophytes and any uncapped posterior condylar bone. This is best achieved with the trial femoral component in place and the tibial resection completed. While an assistant elevates the femur using a bone hook in the intercondylar notch, a curved 3/8-inch osteotome is passed tangentially along all the borders of both posterior condyles to outline the posterior osteophytes and uncapped posterior condylar bone. The trial is then removed, and the outlined bone is resected. The surgeon’s finger can be used to palpate the posterior recesses for any retained bone or loose bodies.
Assessing the Potential for Cementless Femoral Fixation
The use of cementless femoral fixation remains controversial. Most surgeons familiar with cementless femoral fixation report excellent results with this technique. Success is obviously dependent on the initial primary fixation of the component. My own experience with the use of cementless porous-ingrowth femoral components has been excellent and equivalent to results with cemented fixation.
I have collected some data on bilateral simultaneous knee arthroplasties with a cementless femur on one side and a cemented one on the other.8 Fluoroscopically controlled evaluation of the lateral radiograph of these patients indicates that the femoral zone IV interface of the cementless components is more favorable than the zone IV interface in cemented components. This finding has implications for long-term survivorship, since zone IV lucency may predispose the knee to late femoral component loosening9 or allow ingress of wear debris and subsequent osteolysis. For this reason, I still advocate consideration of cementless femoral fixation in younger patients. (The zone system was developed by the Knee Society.10)
The intra-operative criterion for cementless fixation combines the assessment of the precision of the fit as viewed from the side and of the force required to disimpact the trial from the femoral bone. The disimpaction test is admittedly crude but appears to be effective in screening patients. If the trial femoral component can be removed by hand or with a very light tap of the slap hammer of the insertion/extraction device, the femoral component always is cemented. If it takes multiple taps of the slap hammer and trial extraction is difficult, cementless fixation is appropriate. In borderline cases, the femur should be cemented.
The precision of the cuts as viewed from the side does not appear to be as critical to the success of cementless fixation. If there are large gaps, the femur should obviously be cemented. If there are small gaps, they can be filled with bone slurry, and clinical success of the technique can be expected if the component passes the disimpaction test.
On follow-up lateral radiographs of cementless femoral components, variations in the bone density pattern are sometimes seen depending on the intimacy of contact between the femoral component and the bone in any specific area.
Preparation of the Patella
Clearing the Quadriceps Tendon
Any residual synovial tissue on the quadriceps tendon just above the superior pole of the patella should be removed to avoid the potential for postoperative soft tissue crepitus in a PCL-retaining technique or the clunk syndrome in a PCL-substituting design.
Measuring Patellar Thickness and Applying a Cutting Jig
Patellar thickness is measured prior to preparation. Female patellae usually are 22-24 mm thick, and male patellae usually are 24-26 mm.11 If available, a patellar cutting jig is applied. It should be set to allow a bone remnant that amounts to the precut patellar thickness minus the thickness of the prosthetic patellar button. Preoperative templating can help plan the resection, especially in dysplastic cases.
Cutting the Patella
I prefer to cut the patella from medial to lateral and from chondro-osseous junction to junction. On the lateral side, all remaining cartilage should be removed down to a sclerotic bone surface. The thickness of the patellar remnant can be measured off the resected medial side. Avoid oversizing the patella in both the anteroposterior and mediolateral dimensions. If undersized, the patellar prosthesis should be displaced medially to facilitate patellar tracking. The uncapped lateral bone should be outlined and then chamfered to relieve possible bone impingement on the metal trochlea. The composite thickness should be measured after preparation to avoid “overstuffing” the patellofemoral compartment. After the patella is properly sized, lug holes are drilled through the appropriate template.
Preparation of the Tibia
Determining the Amount of Tibial Resection
As for the femur, I prefer a measured resection technique based on the thickness of component to replace the resected tissue. For a prosthesis with a composite thickness of 8 mm, 8 mm would be removed from the more prominent plateau, almost invariably the lateral side. This measurement would include any residual cartilage.
If a metal-backed component is being used, a composite thickness as much as 9 mm may be required to allow for the minimum thickness of polyethylene required by the FDA (depending on the thickness of the metal tray). Most total knee systems apply a stylus to assess this thickness.
Alternatively, the amount of resection can be based on removing 0-2 mm from the deficient side. This method should not be used if it means that more than 12 or 13 mm will be removed from the lateral side. In these cases, the deficient side will require some form of augmentation.
Intramedullary versus Extramedullary Alignment
Most total knee systems provide the option of intramedullary or extramedullary tibial alignment devices. I prefer the extramedullary method for the tibia for several reasons. Unlike the assessment of alignment on the femoral side, proximal and distal anatomic landmarks are readily visible on the tibia. Using extramedullary alignment avoids instrumentation of the medullary canal of the tibia with its potential for generating fat embolization and for propagating the extent of any potential postoperative infection. In addition, many tibias have a valgus bow, especially in the patient with a constitutional valgus alignment.
In these patients, long films are required to fully evaluate the bowing and guide the surgeon as to where to enter the medullary canal at the level of the tibial plateau. In some tibias, the bow is so excessive that an intramedullary alignment rod cannot be accommodated. If the surgeon insists upon its use, the tibial resection will be prejudiced into significant valgus. In knees undergoing revision where the surgeon is using a long-press-fit intramedullary tibial extension, intramedullary alignment devices are appropriate. In some cases of bowed tibias, offset stems may be necessary.
Determining Alignment of the Tibial Resection with Extramedullary Devices
Several maneuvers are helpful in increasing the accuracy of an extramedullary alignment device. Proximal and distal landmarks are readily available. Proximally, the resection guide ideally should be centered between the medial and lateral tibial cortices. In reality, this is difficult to achieve because an external alignment device is usually displaced several millimeters medial to the true center because of the tibial tubercle, patellar tendon, and fat pad. As long as the surgeon is aware of this and compensates for it, it will not prejudice the cut into varus. The distal anatomic landmark for an extramedullary device is the readily palpable sharp anterior crest of the tibia.
I do not use the foot, specifically the second metatarsal, as a distal landmark, since any rotational foot abnormality will distort this measurement. The sharp anterior crest of the tibia at the level of the malleoli is an anatomic landmark that is independent of any foot or ankle deformity and is readily palpable, even in obese patients. Some surgeons suggest bisecting the inter-malleolar distance or the soft tissue girth at the ankle. We have documented that the true center of the ankle is approximately 3 mm medial to these two points.12 The surgeon must therefore compensate with an adjustment at the ankle.
The most effective way to compensate for the potential alignment distortions that exist proximally and distally is to have a moveable ankle device that can be displaced medially. Six millimeters of medial displacement will usually compensate for the 3 mm occurring proximally and the 3 mm occurring distally, avoiding varus malalignment of the tibial resection.
Posterior Tibial Slope
Posterior tibial slope in the “normal” knee can be quite variable. I have seen it be anywhere between 0° and 15°. In arthroplasty, posterior slope has both advantages and disadvantages. Advantages include opening up the flexion gap to make PCL balancing easier and enhancing metal-to-plastic contact in maximum knee flexion.
Disadvantages include the promotion of too much rollback of the femur on the tibia in a nonconforming design and mandating that the articulating surfaces must hyperextend on one another when the limb itself is in full extension. I like to apply some posterior slope to the tibial resection but avoid an excessive amount. Generally I use approximately 5°. I achieve this using an external alignment device by moving the ankle adjustment anteriorly away from the ankle. Depending on the length of the limb, 1° or 2° of posterior slope is applied for every 5 mm of anterior displacement of the jig. The effect will obviously be greater for short limbs and smaller for longer limbs.
There are at least three situations in which no posterior slope should be applied. The first is in the presence of a severe preoperative flexion contracture. Increased anterior (versus posterior) tibial resection aids in the correction of a flexion contracture. The second situation is in the presence of a tibia with an abnormal upward rather than downward slope. This is most commonly seen after high tibial osteotomy or in the presence of a healed proximal tibial fracture. The third situation occurs when using a knee system that allows limited hyperextension between the articulating surfaces. This is most commonly seen in posterior stabilized designs where the stabilizing post will impinge on the anterior aspect of the intercondylar housing for the peg. Specific designs vary in their forgiveness, and surgeons must be aware of the limitation of the system they are using.
When the proximal tibial resection is being performed, it is important that the surgeon’s arm is braced against the tibia so that the saw blade is prevented from accidentally cutting out of sclerotic bone and possibly injuring adjacent soft tissues. I brace my left fist up against the proximal tibia while controlling and aiming the saw with my right hand. It is extremely important that the medial collateral ligament (MCL) be protected during the resection by placement of a metallic retractor between the ligament and the medial border of the proximal tibia.
There are several ways to protect the PCL during the resection. One is to create a small slot in front of the PCL using an oscillating saw and then insert a 1-cm-wide osteotome into the slot to protect the posterior tissues from the excursion of the oscillating saw. A second way is to preserve a wedge-shaped island of tibial spine in front of the ligament by outlining this with an oscillating saw or reciprocating saw. I prefer the latter method and use a wide blade to initiate the tibial resection to the mid-coronal plane and then outline the saved wedge of tibial spine with the saw blade. I then switch to a narrow blade and complete the medial and lateral resections. The preserved island can be denuded of soft tissue in situ with the oscillating saw and severed just in front of the PCL to be used as a bone plug to seal off the femur where the hole was made for the intramedullary femoral alignment device. The tibial surface is best exposed by placement of a Z-retractor or bent Hohmann retractor medially, a bent Hohmann laterally, and a forklike retractor posteriorly that straddles the PCL tibial insertion.
Sizing the Tibia
Once the tibial resection has been completed, the tibia can be sized. Most systems allow independent sizing of the femur and the tibia so that one size larger or smaller on either side is compatible. I have rarely seen a two-size discrepancy. This might occur if one bone is affected with Paget’s disease or if its size influenced by the specifics of a healed fracture. The goal of sizing the tibia is to maximally cap the bone while avoiding significant tray overhang. Any overhang anterior to the mid-sagittal plane of the tibia can be symptomatic, causing a painful soft tissue inflammation. Posterior overhang is frequent on the lateral side because this dimension is generally shorter than the AP dimension on the medial side. Slight posterior overhang (several millimeters) appears to be well tolerated and rarely symptomatic. Overhang of more than a few millimeters could conceivably cause popliteus impingement.
When I have to choose between tibial sizes, I prefer to use the smaller size to avoid the possibility of symptomatic overhang. In the presence of a severe varus deformity requiring release of medial structures, I intentionally undersize the tray and shift it laterally. The uncapped medial bone is outlined and removed effectively, accomplishing a medial release by shortening the distance between the origin and insertion of the medial collateral ligament.
Determining the Rotational Alignment of the Tibial Component
At least three ways have been described to orient the rotational alignment of the tibial component.6 The first method is to use an asymmetric tray that mimics the cut surface of the tibia and apply the tray anatomically. Although this method can possibly achieve maximal capping of the tibia, there are two difficulties with its use. The first involves the fact that it ignores the linkage of the tibial rotation to that of the femur when the knee is in extension and the articulation is maximally loaded during walking. The second problem is related to the first in that if the surgeon wishes to change the tray rotation for better articular congruency with the femur, rotating the asymmetric tray will accentuate any anterior or posterior overhang.
A second way to align the tibial rotation is to base it on the tibial tubercle. The most commonly used landmark is the junction between the medial and central thirds of the tubercle. This method, like the others, ignores the attempt to establish articular congruency between the femur and the tibia for each individual knee when it is extended and loaded. These first two methods can only be successful in the presence of a rotating platform type of articulation that allows the insert to automatically accommodate to the femur throughout the arc of motion.
The third method is the one I believe must be used for fixed-bearing components. This is to first establish the femoral rotation properly and then correlate the tibial rotation with the femur when the knee is in extension. Systems vary as to how forgiving they are to the amount of rotational mismatch that will not create significant torsional forces on the articulation that would then be transferred to the insert tray interface and then possibly to the prosthesis-cement or bone-cement interface. Articulations with high conformity on the top side are the least forgiving and the most likely to be responsible for generating torsional stresses that can accentuate back-side wear.13
Preliminary (and often final) ligament balancing is accomplished during initial exposure prior to final preparation of the femur and tibia. Varus/valgus stability in flexion is achieved via femoral component rotation. Fine-tuning of all aspects of ligament balancing is done after placement trial of the trial components.
In a PCL-retaining technique, the tibial trial component must always be placed first. I believe that if the surgeon is able to insert the femoral component followed by the tibial component, the flexion gap is probably too lax unless the trial is a flat articulation with no sagittal conformity. In a PCL-substituting technique, however, the femoral component can be inserted first, and in fact this is often recommended.
The initial thickness of tibial trial chosen is the thinnest composite available for the system unless it is obvious that the flexion and extension spaces will require a thicker size.
Flexion stability is assessed first. This is done by applying the POLO test for a fixed-bearing articulation.14 With the knee at 90° of flexion, the surgeon attempts to pull the tibial trial out from underneath the femoral component. In essence, this is a flexion distraction test, which depends on the height of the posterior lip of the tibial trial relative to the bottom of its sagittal curvature. This difference indicates how much the flexion gap must open up to allow the tibial trial to be pulled out from underneath the femoral component. I generally use a trial that has a posterior lip with a height of approximately 3 mm so I am performing a 3-mm distraction test. A corollary of this test is the inability to push in the tibial trial underneath the femur with the knee in 90° of flexion.
If pullout is not possible, the flexion gap is not too loose and now must be assessed to see if it is too tight. This is done by observing lift-off of the tray from the anterior tibial cortex when the knee is flexed between 80° and 100°.
This lift-off is the result of a tight PCL forcing the femur posteriorly so that it impinges on the posterior lip of the tibial component, pushing the tray down in back with corresponding lift-off in front. If the sagittal tibial topography is flat, excessive rollback can occur without lift-off. The extent of this rollback is best observed with the patella relocated. This is because an everted patella and quadriceps mechanism will artificially pull the tibia into external rotation during flexion, promoting excessive rollback on the medial side. This may also create an artificially positive lift-off test with a curved insert. Positive lift-off, therefore, should always be confirmed with the patella relocated. The PCL can also be observed and palpated for its tension. Another common observation with a tight PCL is movement forward or distally of a femoral trial in flexion beyond 90°. This is because ligament tension is forcing rollback and an imprecisely fitting trial compensates by moving forward or distally to remain congruent with the sagittal conformity of the trial insert. In a rotating platform articulation, the “Slide-Back” test is used to balance the PCL.14
When I am assessing the flexion gap in a PCL-substituting knee, I adhere to the pull-out test to avoid excessive laxity and total dependence on the prosthetic constraint.
Adjusting Flexion/Extension Gaps
After the trial components are inserted, the flexion and extension gaps are assessed starting with the thinnest composite thickness of tibial component. Each gap can be too loose, too tight, or of appropriate tension. The level of the distal femoral resection influences the extension gap. The level of the posterior condylar resection influences the flexion gap. The level of the tibial resection influences both the flexion and the extension gap.
If both flexion and extension gaps are too loose, a thicker tibial component is required. If both gaps are too tight, more tibial resection is necessary. Proper spacing of the flexion gap takes place first, and any residual tightness or laxity in the extension gap is corrected secondarily.
The easier mismatch to fix is when the extension gap is tighter than the flexion gap. This is treated by increasing the distal femoral resection. The more difficult mismatch to resolve is when the flexion gap is tighter than the extension gap and the PCL is being preserved. There are four ways to deal with a tighter flexion gap. The first is to increase the posterior slope of the tibial cut but to avoid a posterior slope greater than 10°. The second is to release the PCL. I prefer to do this from its femoral attachment. The third is to downsize the femoral component to one with a smaller anteroposterior dimension as long as notching of the anterior femoral cortex is avoided. This downsizing will require more posterior condylar resection and will therefore increase the flexion gap without affecting the extension gap.
The fourth method is to stabilize the flexion gap with the appropriate tibial resection and thickness of tibial component and treat the lax extension gap by cementing the femoral component proud of the bony cuts to a level that achieves extension stability. Several tricks can be used to accomplish this. One is to use distal femoral metallic augments if available for the system being implanted. A second is to underdrill the femoral lug holes if lugs are present on the femoral component. This will allow the lugs to bottom out at the level of the depth of the drilling and prevent the femoral component from becoming fully seated. Confirmation that this method will be appropriate can be obtained by using the real femoral component as if it were a trial. This method of underdrilling a lug hole can also be used to cement a femoral component asymmetrically proud and adjust the varus/valgus alignment of the femoral component if necessary. It must be remembered that if the femoral component is cemented proud of the distal resections, some posterior condylar bone may be uncapped to the extent that the component is proud of the cuts. If so, this anatomic area should be revisited to remove any uncapped posterior condylar bone and relieve potential impingement with the posterior lip of a tibial component.
Assessment of Patellar Tracking
At the time of testing components, patellar tracking is also assessed. I use the so-called “rule of no thumb” test for this assessment.15 In this maneuver, the patella is returned to the trochlear groove and the knee is flexed without the surgeon’s thumb or without clamps or sutures securing a capsular closure. If the patella tracks congruently when the knee is flexed, with good contact between the medial facet of the patellar prosthesis and the medial aspect of the trochlear groove, no lateral release need be contemplated. However, if the patella dislocates, partially dislocates, or tilts laterally, a lateral release may be indicated. It is reasonable to repeat the “no thumb” test with the tourniquet deflated to be certain that restricted quadriceps movement is not responsible for a positive test. I would also repeat the test with one suture closing the capsule at the level of the superior pole of the patella. If tracking is now congruent and the tension on the suture is not excessive, no lateral release is necessary.
Final Preparation Prior to Cementing of Components
Final preparations are made to insert the real prosthetic components. The lug holes for the femoral component are now completed.
I delay this step until the end in case the femoral resection has to be increased or modified. In the system I use, the spikes that hold the cutting jigs are smaller than the component lugs and would not allow reapplication of these jigs to be secure and accurate.
All bone surfaces are now cleansed with pulsatile lavage. An exception occurs when cementless fixation is being utilized on the femoral side. If there is sclerotic medial tibial bone (as is common in a preoperatively varus knee), I use a punch or drill to make multiple small holes for cement penetration. At this time, however, I have no proof that this makes for a better bone-cement interface and longevity.
Cementing Components
The tibial component is cemented first. Cement is placed into the metaphysis for the stem or keel of the prosthesis and then onto the tibial plateau. The component is tapped into position. Any extruded cement is removed. If the knee is modular, the tibial insert is not yet applied.
Next, the femoral component is cemented. Cement is placed on all the femoral surfaces except only a thin film is smeared and pressurized onto the posterior condylar surfaces. This is to prevent extrusion of cement to the back of the knee where it is hard to access. Cement is also placed into the recesses of the prosthetic posterior condyles and chamfers. With this technique, any extruded cement will come forward and can be removed. After the femoral component is partially impacted into position, the trial modular insert is placed into the tray and femoral impaction is completed. Finally, the knee is brought to full extension to pressurize the bone-cement interface during polymerization. If the knee was in varus preoperatively, I prefer to apply a gentle valgus stress in full extension as the cement polymerizes. This is to avoid the possibility of inadvertently applying a varus stress that could cause lift-off of the lateral side of the prosthesis and possibly adversely affect the lateral bone-cement or prosthesis-cement interface.
When the knee is maximally extended, more cement always extrudes from beneath the femur and sometimes anteriorly around the tibial tray. I flex the knee 30°-45° after the initial extension of the knee to gain access to remove this extruded cement. The knee is then extended for a final time to pressurize the bone-cement interface. I leave a little extruded cement anteriorly to determine when polymerization is complete.
After full polymerization, the knee is flexed, the tourniquet is deflated, and a second dose of antibiotic is administered. This is to assure maximum concentration of antibiotic in the postoperative joint hematoma. Bleeding is controlled via electrocautery. The most common vessels encountered are the medial superior geniculate in the capsular incision just above the patella and the medial inferior geniculate at the level of the fat pad.
The trial insert is then removed. The entire periphery of both the femoral and tibial components is checked for any additional extruded cement. The femur is lifted with a bone hook, and the posterior condyles are inspected and palpated for cement extrusion. I also use a 1-cm curved osteotome covered by a gauze sponge to sweep the posterior condyles for retained cement. Finally, the real insert is placed.
Prior to initiating closure, I like to pass an instrument such as a pituitary rongeur along the medial and lateral gutters at the level of the joint line and medially and laterally in the intercondylar notch. This is to assure that no osteophytes remain that might impinge on the polyethylene.
Draining and Closing the Wound
I prefer to drain the knee after an arthroplasty. I place two small suction drains laterally and bring them out through separate stab wounds. I leave about 5 cm of the drain inside the knee. The drains are always removed the morning after surgery. I believe their most important function is to decompress the wound during the first hour or so after deflation of the tourniquet and wound closure. If drainage is excessive after this period of time, I would consider clamping the drains or even removing them. Many surgeons have stopped using drains in routine cases.
I close the fat pad separately with several No. 2-O resorbable sutures. The capsule is closed with interrupted No. 1 monofilament resorbable sutures. I do not consider it necessary to perform the closure in flexion. The closure is initiated at the superior pole of the patella where medial and lateral marks have been made at the time of the initial arthrotomy to aid in lining up the closure at the end of the procedure. The closure is always anatomic unless the patient had a severe preoperative flexion contracture. In that case, the medial capsule is advanced distally on the lateral capsule to take the laxity out of the quadriceps mechanism and minimize a postoperative extensor lag. The subcutaneous tissue is closed in layers with No. 2-O resorbable sutures for the deeper layer superiorly and No. 3-O inferiorly and for the more superficial tissues superiorly. I use No. 3-O interrupted nylon closure for the skin. The knots are initiated medially, and the suture is a vertical mattress type that is subcuticular on the lateral side. An interrupted closure eliminates the abnormal tension that would occur across a continuous subcuticular closure in maximal knee flexion. It also allows treatment of a minor wound healing problem if one or two sutures have to be removed for débridement and irrigation.
After the capsule is closed, the knee is flexed against gravity to measure the patient’s quadriceps excursion and potential final flexion.16 The wound is dressed with nonadhesive gauze, sterile pads, and an elastic bandage from the foot to the thigh.
If the skin edges are oozing at the time the dressing is to be applied, I have found that taking 5 minutes to hold pressure on the incision will inevitably stop the bleeding and relieve postoperative concerns of draining incisions and stained dressings.
Immediately after surgery, the knee is placed in a knee immobilizer to minimize the chance of developing an early flexion contracture and protect those patients who have received a 24-hour femoral nerve block.
Peri-Operative Management
Rehabilitation Protocol
Rehabilitation protocols continue to evolve and accelerate. If possible, patients begin ambulation the day of surgery. A knee immobilizer is often applied at night to maintain extension and provide comfort for transfers and initial ambulation the day of surgery. It is also used post-operative day one until any femoral nerve block has worn off. Depending on their social situation, patients can be discharged home on the second or third day after surgery or to a rehabilitation or skilled nursing facility.
Weight-bearing for distances is protected with crutches or a walker for 4 weeks, but I permit full weight-bearing as tolerated at home with the protection of a cane, crutch, wall, sink, counter, or furniture. Home visits by a physical therapist occur twice a week for several weeks.
If the left knee has been replaced, the patient can resume driving when comfortable and off narcotics. For the right knee, driving is delayed for 4 weeks from surgery.
All support is discontinued at 4 weeks except for a cane for distances at the patient’s discretion.
Follow-Up Appointments
The initial postoperative visit occurs approximately 4 weeks after surgery. Sutures have been removed at 12-14 days after surgery by a visiting nurse or at the rehabilitation facility.
The wound is checked along with range of motion and ambulatory ability. Postoperative radiographs including a standing AP, lateral, and skyline view are obtained and reviewed with the patient and family along with a prosthesis similar to their own implant. Further expectations are reviewed and printed information given regarding antibiotic prophylaxis. If post-operative range of motion is less than expected, patients call in their range of motion weekly and are scheduled for a knee manipulation 6-8 weeks after their surgery if they fail to improve. This amounts to 1% or 2% of patients. A “dynasplint” is sometimes prescribed for flexion contractures greater than 15°.
I ask my patients to send in a written progress report at 3 months and to see me for an examination and radiograph at 1 year. Future examinations will occur at 3, 5, 7, 10, 12, and 15 years postoperatively assuming no worrisome symptoms appear during the intervals.
Equipment
The implant used in this procedure was the PFC Sigma CR TKA (DePuy, Inc. Warsaw, IN).
Disclosures
In the past, the author has received royalties for intellectual property licensed to DePuy, Inc. for the PFC Sigma TKA system. Any royalties from Elsevier for the book “Total Knee Arthroplasty” are contributed directly to a charitable organization.
Statement of Consent
The patient referred to in this video has given their informed consent to be filmed and is aware that information and images will be published on-line.
Citations
- Scott RD. Total Knee Arthroplasty. 2nd ed. Philadelphia, PA: Saunders; 2014.
- Masini MA, Madsen-Cummings N, Scott RD. Ipsilateral total knee arthroplasty after arthrodesis of the hip. J Orthop Tech. 1995;3:1-5.
- Yacoubian SV, Scott RD. Skin incision translation in total knee arthroplasty: the difference between flexion and extension. J Arthroplasty. 2007;22(3):353-355. doi:10.1016/j.arth.2006.04.009.
- Springorum HP, Scott RD. A technique to facilitate everting the patella in stiff or obese knees in total knee arthroplasty. Am J Orthop (Belle Mead NJ). 2009;38(10):507-508. https://www.amjorthopedics.com/article/technique-facilitate-everting-patella-stiff-or-obese-knees-total-knee-arthroplasty.
- Olcott CW, Scott RD. Femoral component rotation during total knee arthroplasty. Clin Orthop Relat Res. 1999;367:39-42. doi:10.1097/00003086-199910000-00005.
- Scott RD. Femoral and tibial component rotation in total knee arthroplasty: methods and consequences. Bone Joint J. 2013;95-B(11)(suppl A):140-143. doi:10.1302/0301-620X.95B11.32765.
- Barnes CL, Scott RD. Popliteus tendon dysfunction following total knee arthroplasty. J Arthroplasty. 1995;10(4):543-545. doi:10.1016/S0883-5403(05)80159-7.
- Huddleston JI, Scott RD, Wimberley DW. Determination of neutral tibial rotational alignment in rotating platform TKA. Clin Orthop Relat Res. 2005;440:101-106. doi:10.1097/01.blo.0000185448.43622.77.
- King TV, Scott RD. Femoral component loosening in total knee arthroplasty. Clin Orthop Relat Res. 1985;194:285-290. https://journals.lww.com/clinorthop/Abstract/1985/04000/Femoral_Component_Loosening_in_Total_Knee.46.aspx.
- Ewald FC. The Knee Society total knee arthroplasty roentgenographic evaluation and scoring system. Clin Orthop Relat Res. 1989;248:9-12.https://journals.lww.com/clinorthop/Abstract/1989/11000/The_Knee_Society_Total_Knee_Arthroplasty.3.aspx.
- Chmell MJ, McManus J, Scott RD. Thickness of the patella in men and women with osteoarthritis. Knee. 1995;2(4):239-241. doi:10.1016/0968-0160(96)00027-0.
- Rispler DT, Kolettis GT, Scott RD. Tibial resection in total knee arthroplasty using external alignment instrumentation based on the true center of the ankle. J Orthop Tech. 1994;2(2):63-67.
- Schwarzkopf R, Scott RD, Carlson EM, Currier JH. Does increased topside conformity in modular TKA lead to increased backside wear? Clin Orthop Relat Res. 2015;473(1):220-225. doi:10.1007/s11999-014-3648-0.
- Scott RD, Chmell MJ. Balancing the posterior cruciate ligament during cruciate-retaining fixed and mobile-bearing total knee arthroplasty. J Arthroplasty. 2008;23(4):605-608. doi:10.1016/j.arth.2007.11.018.
- Scott RD. Prosthetic replacement of the patellofemoral joint. Orthop Clin North Am. 1979;10(1):129-137.
- Lee DC, Kim DH, Scott RD, Suthers K. Intraoperative flexion against gravity as an indication of ultimate range of motion in individual cases after total knee arthroplasty. J Arthroplasty. 1998;13(5):500-503. doi:10.1016/S0883-5403(98)90047-X.

| Publication Date | 8/16/2017 |
| Article ID | 20 |
| Production ID | 0062 |
| Volume | 2017 |
| Issue | 20 |
| DOI | |
| https://doi.org/10.24296/jomi/20 | |